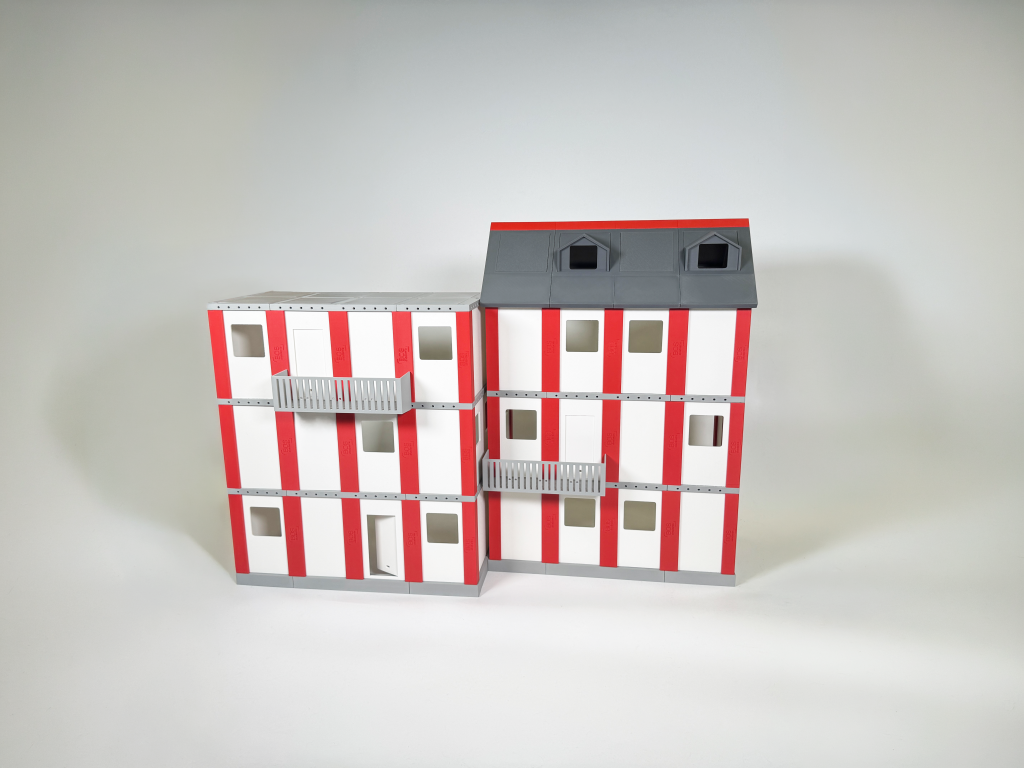
In this assembly guide, we show you step by step, with videos, how to assemble the building facade. The modular building facade for the Drehleiter-Trainer It can be flexibly assembled and adapted to different training scenarios. Windows, doors, and floors can be arranged depending on the desired training situation.
Important instructions
- A stable, level surface is required.
Ensure that the assembly takes place on a stable, level surface. Uneven or unstable surfaces can lead to a risk of tipping.
- Protect from direct sunlight and heat.
The building facade and its components may not exposed to direct sunlight or high temperatures for extended periods Therefore, do not leave the system permanently in the sun and store the components in a dry place, protected from direct sunlight.
- Read the assembly instructions completely.
Read the instructions completely before beginning assembly. The individual steps build upon each other.
- No use of force.
Components must not be installed with excessive force. Always check for jams or resistance – do not force.
- Observe safety instructions.
The enclosed user manual must be read and followed before commissioning. - Transport must be carried out by two people.
The fully assembled building facade may not lifted or moved alone This will be necessary, as otherwise there is a risk of injury and damage to the system.
1. Foundation
1.1. Prepare the foundation elements
For the foundation you will need the grey foundation elements without side holes.
First, lay out the elements in front of you according to the desired floor plan. Make sure they are correctly oriented: The Drill holes for the later installation of the pillars are located along the frame elements and must each be attached to the Exterior of the floor plan lay.
1.2. Insert the pin
Set the black cone in the Drill holes at the short ends of the foundation elements one, that is, where two elements are joined together.
1.3. Assemble the foundation
Assemble the individual foundation elements using the inserted pegs.
This creates the complete foundation on which the building facade is subsequently built.
2. Position the Pillars for One Floor
2.1. Align the Pillars
Prepare all the pillars required for the first floor. The pillars you need will depend on the desired layout of your building.
Each pillar has a small arrow on one side. This serves as an orientation guide and must always face upwards .
Check the orientation of each pillar before inserting it.
2.2. Inserting the pins
For pillars, the pin can simply be inserted into the opening at the bottom.
Pillars that are placed on top of other pillars receive a normal tenon.
Special case: Pillars that above a double wall element sitting, need a slotted stud. This one looks like a normal tenon, but has a slot in the middle. The slot faces downwards during installation, allowing the tenon to be placed on a wall element.
If a pin needs to be removed, this is best done carefully with pliers.
2.3. Placing pillars
Insert the prepared pillars with the inserted tenons into the designated holes in the foundation.
Use at the Corner pillars at the corners and at the lateral ends of the foundation. In all other positions the double-sided pillar used.
Gently press each pillar downwards until the pin is fully seated in the hole.
2.4. Check the position of the pillars
Finally, check all installed pillars.
All pillars should be straight and securely set in the foundation. Also, double-check the alignment of all arrows. Only then should doors, walls, and windows be installed.
3. Install the Wall Elements for One Floor
3.1. Select the Wall Elements
Select the appropriate wall elements to match your desired construction.
You can choose between closed wall elements (single or double), window elements and door elements choose.
3.2. Installing wall elements
Insert the wall element from above between the two pillars and carefully slide it downwards until it rests flush on the foundation.
If a wall element is difficult to insert, first check the alignment of the wall element and the pillars. Do not use force to avoid damaging the components.
3.3. Check the seat
Finally, check all installed wall elements.
All elements should be flush between the pillars and not jammed before you proceed with the construction of the next floor.
4. Assemble the intermediate floor frame
4.1. Prepare the frame elements
For the intermediate floor frame you will need the grey frame elements with small round holes on the sides.
4.2. Inserting connectors
Set the small, thin black connector into the recesses at the short ends of the frame elements.
4.3. Assemble the frame
Connect the individual frame elements together until the complete intermediate floor frame has been created according to your floor plan.
4.4. Place the intermediate floor frame
Place the finished intermediate floor frame onto the pillars of the floor below from above.
5. Build additional floors
5.1. Setting up the pillars
Place the next row of pillars on the intermediate floor frame.
Make sure that all subsequent projectiles are also in good working order. the arrows on the pillars point upwards.
5.2. Installing wall elements
Reinsert the desired wall, window, and door elements between the pillars.
5.3. Install the intermediate floor frame
Then build the next intermediate floor frame as shown in Step 4 Assemble the described sections and place them on the pillars.
5.4. Installing the balcony
Set the small black connector into the designated holes in the balcony.
Then insert the balcony into the side holes of the desired position. Intermediate floor frame.
Depending on the desired design, the balcony can be installed in different positions.
5.5. Repeat the setup
Repeat the setup from Pillars, wall elements and intermediate floor frames, until you have reached the desired number of shots.
6A. Enclosing the building – flat roof
6A.1. Place and secure the intermediate shelf.
Set instead of another intermediate floor frame, a complete intermediate floor up to the top floor.
Carefully lift the pre-assembled intermediate floor and align the openings with the pillars of the floor below. Then lower the intermediate floor evenly until it rests fully on all pillars and wall elements.
Check that the intermediate floor sits flush and that no components are jammed.
Next, secure the intermediate shelf by inserting four short grey pegs into the corner openings. These connect the intermediate shelf to the corner posts below and ensure that the intermediate shelf remains securely in position.
6A.2. Install intermediate floor inserts
Install all grey intermediate shelf inserts.
6B. Enclosing the building – Gable roof
6B.1. Connect roof surface
The gable roof is supplied as two pre-assembled roof panels. The roof ridge is already attached to one of the roof panels.
Now connect the second roof panel to the free side of the roof ridge. Use the black connectors for this. Slide the roof panel evenly onto the connectors until both roof panels are flush and form a stable unit.
6B.2. Install gable
Next, place the two pre-assembled gables onto the uppermost intermediate floor frame of the building.
To do this, insert the black cone into the middle hole of the gable underside and then insert it into the provided recesses of the uppermost intermediate floor frame.
If there is a double wall under the gable, use a mortise and tenon joint at this point. This enables the correct connection with the underlying wall elements.
Then make sure that both gables are fully and securely in place.
6B.3. Prepare gable end
Insert the short gray connector pins into the designated openings on the top of both gables.
Then insert the small black connectors into the side guides of the gables. These will later connect the gables to the roof panels and ensure a secure fit.
6B.4. Place roof surface
Carefully lift the roof panel with two people and place it evenly onto the two gables.
Make sure that the side connectors fit properly into the designated mounts on the roof panels. If the roof cannot be fully seated immediately, check the position of the connectors and adjust them slightly if necessary. Do not use force.
6B.5. Installing roof inserts
Next, insert the grey inserts and dormer windows into the designated openings in the roof surfaces.